Showing posts with label TPP. Show all posts

Friday, August 8, 2014

Beach Life PTU Tut

Supplies Needed:
PSP: I used PSP9, but any version should do.
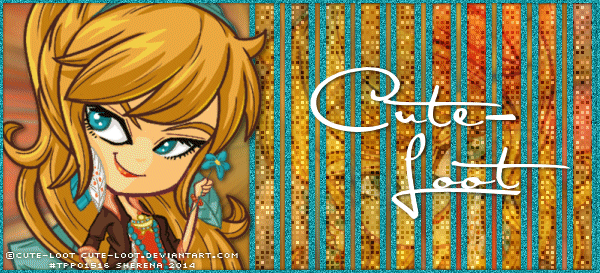
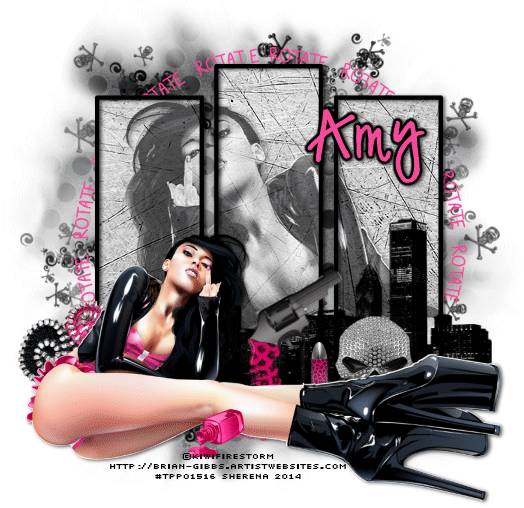
 Kit of Choice: I used Shellina by Irish Princess Designs. You can buy it here.
 Tube of Choice: I used a tube by PinUpToons. You can find it here. Please do not use without the proper license!
Template of Choice: I used  Temp176 by Amy & Leah. You can find it here.
Mask of Choice: I used  FM1 mask. I am not sure where I got this. If it belongs to you please let me know!
 Font of Choice: I used I used Surf Safari. You can find it here.
 
Let's get started!
 
 Open template
Shift+D to duplicate
Close original
Delete copyright layer
Canvas size 600X600
Replace each layer with paper or element of choice
I used the following:
words 1: adjust to #ecf2f0; inner bevel
words 1 back: adjust to #272823; DS
words 2:adjust to #ddddc4
words 2 back: adjust to #272823; DS
words 3: adjust to #7c9b99; select all, float, defloat & apply Eye Candy 5: glass (watery setting)
words 3 back: adjust to #272823; DS
1: IPD_Shellina_19; resize 35% & DS
2: IPD_Shellina_79; mirror, resize 35% & DS
3: IPD_Shellina_18; mirror, resize 35% & DS
4: IPD_Shellina_Paper3; adjust color to match words 3; apply eye candy gradient glow & DS
5: IPD_Shellina_Paper5; apply eye candy gradient glow & DS
6: IPD_Shellina_Paper4; apply blinds twice (horizontal & vertical); apply eye candy gradient glow & DS
7: IPD_Shellina_Paper7; adjust color to match words 3; apply eye candy gradient glow & DS

(C/P all elements as new layers)
IPD_Shellina_6: resize 35%, duplicate & mirror
IPD_Shellina_39: resize 55%, duplicate & merge down; flip, duplicate, mirror & merge down
IPD_Shellina_80: resize 45%, duplicate, mirror, merge down & resize 90%
IPD_Shellina_58: resize 70%
IPD_Shellina_74: resize 25%
IPD_Shellina_90: resize 25%
IPD_Shellina_70: resize 20%
IPD_Shellina_68: rsize 65%, duplicate & mirror
tube: resize if needed

Add DS where desired

C/P paper of choice as bottom layer
Apply mask & merge

Crop & resize
Add name & copyright
Save as .png & you're done!

I would love to see your results! If you would like to share just send them to me: sherenassweettreats@yahoo.com

Tuesday, March 11, 2014

Sweet PTU Tut

Supplies Needed:
PSP: I used PSP9, but any version should do.
 Kit of Choice: I used So Bitter Sweet by Sam's Scraps. You can buy it here.
 Tube of Choice: I used Snow Angel by Verymany. You can  find it here. Please do not use without the proper license!
Mask of Choice: I used WSL_Mask84 here.
  Font of Choice: I used I used Xiomara. You can find it here.
Let's get started!
 New canvas 600X600
C/P 3LH12 - SBS Frame 5
Resize 45%
Select inside with magic wand
Expand by 3
C/P paper of choice under frame layer
(I used 3LH12 - SBS Paper 18)
Invert selection, delete & deselect
C/P closeup tube above paper
Resize if needed & arrange inside frame
Erase any parts showing outside of frame
Change blend mode to Luminance(Legacy) & opacity to 45
DS frame & merge visible
Move to left
C/P tube
Resize if needed (I resized & mirrored mine.)
DS tube

To make the rug:
Select the Ellipse Tool
Mode: Draw Ellipse
Foreground: Null Background: any color
Draw out an oval the size you want your rug
Horizontal center & Convert to Raster
Apply Eye Candy 5:Textures Animal Fur
Settings- Dalmation, Low Coverage
Pattern- Base Color: #ffcddc Spot Color: #ffcddc
Leave everything else the same


C/P elements of choice
I used the following:
3LH12 - SBS chocolates: resize 25%
3LH12 - SBS present: resize 45%
3LH12 - SBS plush bunny: resize 35%
3LH12 - SBS string: resize 45%
3LH12 - SBS flower 8: resize 10%
3LH12 - SBS flower 1: resize 15%; duplicate & mirror
3LH12 - SBS cocktail glass: resize 25%

DS elements

C/P paper of choice (I used 3LH12 - SBS Paper 13.)
Apply mask & merge group
Mirror

Crop & resize
Add name & copyright
Save as .png & you're done!

I would love to see your results! If you would like to share just send them to me: sherenassweettreats@yahoo.com

Friday, January 10, 2014

Boho Chick No Scrap Tut

Supplies Needed:
PSP: I used PSP9, but any version should do.
 Tube of Choice: I used a tube by Cute-Loot. You can  find it here. Please do not use without the proper license!
 Font of Choice: I used Satisfaction. You can find it here.
Animation Shop
MuRa's Meister Copies: Just Google it. It's out there somewhere :)
Xero: Fritillary here

Let's get started!


New canvas 600X273
C/P tube
MuRa's Meister Copies Wallpaper (rotate)
Default settings
Adjust-Blur-Radial Blur
Zoom, Strength:50; Elliptical checked; Horizontal, Vertical & Protect center 0
Duplicate layer & flip
Rectangle Tool Foreground Null, Background any color
Draw out a thin vertical rectangle
Align in center & convert to raster
MuRa's Meister copies Line
Default Settings except change Number to 17
With Selection tool select 7 rectangles on left
Delete & Deselect
Crop merged opaque
Select All-Float Defloat
On top background layer Delete
Add New Layer
Select Selection Borders Both Sides; Anti Alias checked; Border width 3
Floodfill with color of choice
Add Noise- Gaussian; Monochrome checked; 35
Deselect & delete rectangles layer
C/P tube between background layers
Adjust blend mode/opacity (I changed mine to Soft Light)
C/P tube Resize if needed
Mirror & place to left
New layer
Floodfill with same color as before
Select All & contract by 3
Delete & Deselect
Add Noise with same settings as before

Add DS

Add name & copyright

To Animate:
Duplicate bottom background layer twice so you have a total of 3
On top duplicate layer Xero: Fritillary
Granularity-5 Aggression-30 Tesselation-100 Variation-100
On next layer change Variation to 105
On bottom layer change Variation to 110
Copy merged & paste in Animation Shop (AS)
Back in PSP, hide top background layer
Copy merged & paste after current selection in AS
Back in PSP, hide middle background layer
Copy merged & paste after current selection in AS
Select all & adjust frame properties until you're happy with them
View animation & save
 
I would love to see your results! If you would like to share just send them to me: sherenassweettreats@yahoo.com 

Rotate PTU Tut

Supplies Needed:
PSP: I used PSP9, but any version should do.
 Kit of Choice: I used Rotate by Gimptastic Scraps. You can find where to buy it here.
 Tube of Choice: I used the matching tube by KiwiFireStorm. You can  find it here. Please do not use without the proper license!
Mask of Choice: I used Mask16-Leah here.
 Font of Choice: I used I used Digs My Hart. You can find it here.
Animation Shop
 
Let's get started!
 
New canvas 600X600
C/P Frame5
Resize 65% & free rotate left 90
Select inside frames with magic wand
Expand by 3
C/P paper of choice (I used Paper6)
Invert Selection & delete
C/P tube
Position & delete
Deselect
Change blend mode to Luminance(L) & opacity to 65%
C/P tube
Resize if needed & mirror

C/P elements of choice
I used the following:
Cityscape- resize 65%
ZippedHeart- resize 65%
Gun- resize 45% & free rotate left 45
Bullet- resize 25%
Nailpolish- resize 25%
SkullScatter- resize 80%
Skull1- resize 45%
WA- resize 65% & recolor

C/P paper of choice (I used Paper5)
Apply mask & merge group
Resize 90%

Crop & resize now
Add name & copyright

To animate:
1. Hide the background, mask, skullscatter & WA layers
2. Merge visible
3. Hide merged layer & unhide background, mask & skullscatter layers
4. Merge visible
5. Copy merged & paste into Animation Shop (AS)
6. Back in PSP, unhide WA & select
7. Copy & paste as a new animation in AS
8. Paste after current selection so you have 2 WA layers
9. Select frame 1 of the WA layers & insert image transition with these settings:
 
You should now have 6 WA layers
10. On your first animation (mask) Copy & paste after selected frame until you have 6 frames
11. On WA animation, Select All & Copy
12. Back on mask animation, Select All & Paste into current selection
13. Back in PSP, hide everything but the top merged layer
14. Copy merged & paste in AS as a new animation
15. Paste after current selection until you have 6 frames
16. Select All & Copy
17. Back on mask animation, Select All & Paste into current selection
18. Change frame properties to 25
19. View animation & save


I would love to see your results! If you would like to share just send them to me: sherenassweettreats@yahoo.com

Thursday, January 9, 2014

Iced Fantasy PTU Tut

Supplies Needed:
PSP: I used PSP9, but any version should do.
 Kit of Choice: I used Iced Fantasy by Tasha's Playground. You can buy it here.
 Tube of Choice: I used Snow Angel by Verymany. You can  find it here. Please do not use without the proper license!
Mask of Choice: I used DD_AssortedMask_6 here.
  Font of Choice: I used I used Xiomara. You can find it here.
Let's get started!
 New canvas 600X600
C/P frame3
Resize 65%
Select inside with magic wand
Expand by 5
C/P paper of choice below frame
(I used paper6)
Invert selection & delete
C/P closeup tube below frame
Resize if needed
Delete & deselect
Adjust blend mode & opacity
DS closeup tube & frame
Merge visible & move to left
C/P tube
Resize if needed & mirror
C/P fairy wing below tube
Resize 80% & free rotate right 15
Duplicate & Mirror
Arrange so wings look like they are coming out the back of tube
Hide everything but tube & wings
Merge visible & DS

C/P elements of choice
I used the following:
beads- resize 75%
butterfly- resize 45%
bottle- resize 45%
candle- resize 35%
chest- resize 35%
flower3- resize 35%, duplicate & mirror
lantern- resize 45%

Add DS

C/P paper of choice as bottom layer
(I used paper7)
Apply mask & merge group


Crop & resize
Add name & copyright
Save as .png & you're done!

I would love to see your results! If you would like to share just send them to me: sherenassweettreats@yahoo.com

Tuesday, December 24, 2013

Little Drummer Girl FTU Tut

Supplies Needed:
PSP: I used PSP9, but any version should do.
 Kit of Choice: I used Christmas Chaos by Tasha's Playground. You can find it here.
 Tube of Choice: I used a tube by Angela Newman. You can get it here. Please do not use without the proper copyright!
Template of Choice: I used Christmas Temp 10 by Amy & Leah's Gimptastic Tuts here.
 Font of Choice: I used Xiomara. You can find it here.
 
Let's get started!
 
Open template
Shift + D to duplicate
Close original
Canvas size 600X600 centered
Delete credits layer
Use papers, colors or elements to replace each layer
I used the following:
words 1: delete
words 1 back: delete
words 2: delete
words 2 back: delete
circle 1: delete
square: paper4
rect 1: lights resized 55%, duplicate & mirror
circle 2: paper10
circle 3: paper10
circle 4: paper3
circle 5: paper1
rect 2: paper5
rect 3: paper5
*OPTIONAL* I used Eye Candy 4000 to put a gradient glow around some of the layers

C/P tube Reszie if needed

Add elements of choice
I used the following:
tree2
bag- resize 45%
reindeer- resize 45%
candle- resize 25%
candycane- resize 25%, free rotate left 45
pole- resize 65%
sparkle3- resize 75%, duplicate a few times & arrange

Add DS

Crop & Resize
Add name, wordart & copyright
Save as .png & you're done!

I would love to see your results! If you would like to share just send them to me: sherenassweettreats@yahoo.com

Friday, November 22, 2013

Gothic Ballet PTU Tut

Supplies Needed:
PSP: I used PSP9, but any version should do.
 Kit of Choice: I used Gothic Ballet by Gimptastic Scraps.You can find where to buy it here.
 Tube of Choice: I used the matching tube by Angela Newman. You can  find it here. Please do not use without the proper license!
Mask of Choice: I used SST-Mask7 here.
 Font of Choice: I used SF Gothican. You can get it here.
  Floor by me (Right click and save)
 
Let's get started!
 
 New canvas 600X600
C/P Frame3 Resize 65%
Select inside the left side of the frame with magic wand
Expand by 3
C/P paper of choice (I used Paper4)
Invert Selection & Delete
Select None
Repeat with right side using a different paper (I used Paper7)
C/P closeup of tube behind frame on left side
Duplicate & Mirror
Erase any parts showing outside frame
Change blend mode on both tubes
C/P tube Resize if needed

DS tube & frame

C/P elements of choice
I used the following:
MeltingHearts- resize 45%
BloodDrips- resize 45%
floor
Bow- resize 35%
Ballerina- resize 65%
Musicnote- resize 45%
FeatherJar- resize 35%
Book- resize 35%
Flower1- resize 35%; duplicate & mirror
Flower3- resize 30%; duplicate & mirror
Candle- resize 35%
Swirl- resize 80%; Duplicate & Mirror

DS elements

Add paper of choice (I used Paper10)
Apply mask & merge group

Crop & resize
Add name & copyright
Save as .png & you're done!

I would love to see your results! If you would like to share just send them to me: sherenassweettreats@yahoo.com

Classic Christmas PTU Tut

Supplies Needed:
PSP: I used PSP9, but any version should do.
 Kit of Choice: I used Classical Christmas by Abstract Creations. You can buy it here.
 Tube of Choice: I used a tube by Suzanne Woolcott. She is no longer selling tubes, so just use what you have. Please do not use without the proper license!
 Font of Choice: I used Alex Brush. It is a PTU font.
Mask of Choice: I used WSL_Mask107. You can find it here.
 
Let's get started!
 
New canvas 600X600
C/P f3 Resize 65%
Select inside frame with magic wand
Expand by 5
C/P paper of choice (I used p8 resized 65%)
Invert Selection & Delete
Select None
C/P tube Resize if needed
Duplicate tube
On duplicate tube Gaussian Blur 3 & change blend mode to Soft Light
DS original tube & frame

Add elements of choice
I used the following:
e15- resize 45%; duplicate a few times & arrange below frame; erase any parts showing outside of frame
e8- resize 45%; Duplicate & Mirror
e16
e10- resize 35%; Duplicate & Mirror
e9- resize 35%
e28- resize 45% & Mirror

DS elements

C/P paper of choice (I used p9)
Move to bottom in layer palette
Apply mask & merge group
Resize 90%
Add noise & Lower opacity (I lowered the opacity to 65)
 
Crop & resize
Add name & copyright
Save as .png & you're done!

I would love to see your results! If you would like to share just send them to me: sherenassweettreats@yahoo.com
 

Friday, November 8, 2013

Thanksgiving FTU Tut

Supplies Needed:
PSP: I used PSP9, but any version should do.
 Kit of Choice: I used Good Gobble by Tasha's Playground. You can find  it here.
 Tube of Choice: I used a tube by Angela Newman. You can  find it here. Please do not use without the proper license!
 Font of Choice: I used A Gentle Touch. You can get it here.
Template Gobble Gobble #0017 by Lucky Star Scraps here

Let's get started!

Open Template
Shift+D to duplicate
Close original
Delete copyright layer
Rotate Image Clockwise 90

Replace each layer with paper or element of choice
I used the following:
15- delete
14- delete
13- delete
12- keep the same
11- paper12 resized 50% & duplicated
C/P closeup tube
Resize if needed
Erase any parts showing outside of rectangles
Change blend mode to Luminance(Legacy)
10- delete
9- delete
8- flower4 resized 65%
7- delete
6- delete
5- flower3 resized 45%
4- keep the same
3- paper10
2- keep the same
1- delete

C/P tube
Resize if needed

C/P elements of choice
I used the following:
platter- resize 45%
turkey- resize 45%
pumpkin- resize 45%, duplicate & resize 85%
flowers
tree2- resize 75%; free rotate right 90
wire- resize 55%; duplicate, mirror, merge down; duplicate, flip & move down

DS where desired

Crop & resize
Add name & copyright
Save as .png & you're done!

I would love to see your results! If you would like to share just send them to me: sherenassweettreats@yahoo.com

Sunday, November 3, 2013

Officer Naughty FTU Tut

Supplies Needed:
PSP: I used PSP9, but any version should do.
 Kit of Choice: I used Married to My Hero by Gimptastic Scraps. It was a Facebook freebie. You can find  it here.
 Tube of Choice: I used a tube by KiwiFireStorm. You can  find it here. Please do not use without the proper license!
 Font of Choice: I used Neuropolitical. You can get it here.
 
Let's get started!
 
 New canvas 600X600
C/P Frame5 Resize 65%
Select inside frame with magic wand & expand by 5
C/P paper of choice (I used Paper4)
Invert selection & Delete
Deselect
C/P closeup of tube inside of frame
Resize if needed & mirror
Erase any parts showing outside of frame
Change blend mode to Luminance(Legacy) & lower opacity
C/P tube Resize if needed
DS tubes and frame

C/P elements of choice
I used the following:
Wire: resize 75%
Glass
CrimeTape: resize 65%
Badge1: resize 35%
Cuffs2: resize 45%
Flower1: resize 45%
Notebook: resize 45% & free rotate right 20
Pen: resize 25%
Mask: resize 85%
DS elements

Crop & resize
Add name & copyright
Save as .png & you're done!

I would love to see your results! If you would like to share just send them to me: sherenassweettreats@yahoo.com

Saturday, October 12, 2013

Autumn Days PTU Tut

Supplies Needed:
PSP: I used PSP9, but any version should do.
 Kit of Choice: I used Your Day by Amy Marie. You can find  it here at The PSP Project.
 Tube of Choice: I used a tube by Ismael Rac. You can  find it here. Please do not use without the proper license!
Mask of Choice: I used WSL117 here.
 Font of Choice: I used Lauren Script. You can get it here.
Let's get started!
 New canvas 600X600
C/P 96 Resize 75%
Select inside window with magic wand
Expand by 5
Add new layer
Muras Meister Cloud
Foreground #85d1cd Background #f7fdfd
Deselect
C/P pp2 & move to bottom in layer pallet
Apply mask & merge group
C/P tube
Resize if needed

Add elements
I used the following:
95- resize 45%
94- resize 25%
31- resize 35%
32- resize 35%
33- resize 35%
74- resize 45%
73- resize 45%
17- resize 15%
64- resize 65%
90- resize 15% free rotate right 30

DS elements & tube

Crop & resize
Add name & copyright
Save as .png & you're done!

I would love to see your results! If you would like to share just send them to me: sherenassweettreats@yahoo.com

Thursday, June 20, 2013

Just Peachy PTU Tut

Supplies Needed:
PSP: I used PSP9, but any version should do.
 Kit of Choice: I used Tropical Peach by Scrappin Krazy Designs. You can find where to buy it here.
 Tube of Choice: I used a tube by Keith Garvey. You can  find it here. Please do not use without the proper license!
Mask of Choice: I used WSL84 here.
Font of Choice: I used Mural Script here.
 
Let's get started!
 
New canvas 600X600
C/P ele11 Resize 65%
Select inside with magic wand
Expand by 3
C/P paper of choice (I used p01)
Invert selection & Delete
Deselect

C/P tube Resize if needed
Erase any parts showing below frame

C/P elements of choice
I used the following:
ele55 Resize 35%
ele54 Resize 35%
ele37 Resize 65% Duplicate & Mirror; Duplicate again & move left, Duplicate & Mirror
ele08 Resize 45%
ele05 Resize 45%
ele28 Resize 25% Free rotate right 90; Duplicate & Mirror
ele35 Resize 35%; Duplicate & Mirror

C/P paper of choice (I used p14)
Apply mask & merge
Resize 95%
 
Crop & resize
Add name & copyright
Save as .png & you're done!

I would love to see your results! If you would like to share just send them to me: sherenassweettreats@yahoo.com
 

Fairy Garden PTU Tut

Supplies Needed:
PSP: I used PSP9, but any version should do.
 Kit of Choice: I used Welcome Spring by Sam's Scraps. You can find it here.
 Tube of Choice: I used a tube by Zindy. You can buy it here. Please do not use without the proper copyright!
Mask of Choice: I used Vix_Mask2Christmas2010. You can find it here
Font of Choice: I used Sacramento here.
Let's get started!

Duplicate & arrange until you have "grass" along bottom of fence
C/P 3LH10 - WS Flowers 17
Resize 35% & move below grass you just made
Duplicate
C/P 3LH10 - WS Garden Bench 1
Resize 35%
C/P tube
Resize if needed
Duplicate, Gaussian Blur 3 & change blend mode to soft light
Merge tube layers together

C/P any elements you want
I used the following:
3LH10 - WS Duck- resize 15%
3LH10 - WS Rabbit- resize 15% & 65%
3LH10 - WS Pot plant- resize 25%
3LH10 - WS bird- resize 15% & 35%
3LH10 - WS Cherry blossom tree- resize 55%, Duplicate & Mirror

Add DS to elements, tube & frame

C/P paper of choice right above background layer (I used 3LH10 - WS Paper 19)
Apply mask & merge group
Use raster deform tool to adjust to your liking
Lower opacity to 65%

Hide mask & tube layers
Merge visible
Duplicate, Gaussian Blur 3 & change blend mode to soft light
Unhide mask & tube layer
 
Crop & resize
Add name & copyright
Save as .png & you're done!

I would love to see your results! If you would like to share just send them to me: sherenassweettreats@yahoo.com

Monday, April 22, 2013

FantasyLand PTU Tut

PSP: I used PSP9, but any version should do.
 Kit of Choice: I used FantasyLand by Creative Intentionz. You can buy it here.
 Tube of Choice: I used a tube that came with the kit.
Mask of Choice: I used WSL_Mask117. You can find it here
Font of Choice: I used Mural Script here.
 
Let's get started!
 
 
New canvas 600X600
C/P grass Move to bottom
C/P ciz_fantasyland_arch
Resize 55% Move slightly left
C/P ciz_fantasyland_fence
Resize 55% Move to left
Duplicate & mirror
Erase any part showing inside arch on both layers
C/P ciz_fantasyland_deer1
Resize 45%
C/P ciz_fantasyland_ferns
Resize 35% & Mirror
C/P ciz_fantasyland_mushrooms
Resize 35% & Mirror
C/P ciz_fantasyland_stumps
Resize 35%
C/P ciz_fantasyland_tree2
Resize 65% & move below grass layer
C/P ciz_fantasyland_rainbow
Position behind arch
Delete any parts showing outside of arch
C/P ciz_fantasyland_butterfly2
Resize 15%
C/P ciz_fantasyland_gardenfae1
Resize 55%

Add DS to desired layers

C/P paper of choice (I used ciz_fantasyland_paper4)
Apply mask & merge group
Resize 90%
I used the raster deform tool to adjust mine

Crop & resize
Add name & copyright
Save as .png & you're done!

I would love to see your results! If you would like to share just send them to me: sherenassweettreats@yahoo.com

Thursday, April 11, 2013

Beautiful Spring FTU Tut

Supplies Needed:
PSP: I used PSP9, but any version should do.
 Kit of Choice: I used Blooming Bears by Digicats(and Dogs). You can find  it here.
 Tube of Choice: I used a tube by Zlata M. You can  find it here. Please do not use without the proper license!
Mask of Choice: I used SST- TDD Exclusive Flower Mask 1 by me. This is an exclusive mask for The Designer's Depot. You can find it here.
 Font of Choice: I used Lauren Script. You can get it here.
My Grass (Click to make full size then rick click & save.)


 Let's get started!

New canvas 600X600
C/P DCD_BlBe_StringFrame05
Resize 65% & free rotate right 90
Select outside frame with magic wand
Expand by 3
Invert selection, add new layer below frame & floodfill with color of choice (I used #b86685)
Deselect
C/P closeup of tube below frame layer
Resize if needed & erase the parts outside of frame
C/P grass position at bottom of frame
C/P tube
Resize if needed & Mirror

C/P elements of choice
I used the following:
DCD_BlBe_StoneBench- resize 45% & Mirror
DCD_BlBe_SBerrie12- resize 45% & Duplicate
DCD_BlBe_SBerrie3- resize 15%
DCD_BlBe_Butterfly01- resize 15% free rotate 15 right
DCD_BlBe_Flower04- resize 10% & Duplicate a few times

D/S Frame, tube & elements

C/P paper of choice (I used DCD_BlBe_Paper (7))
Apply mask & merge
Lower opacity to 65%

Crop & resize
Add name & copyright
Save as .png & you're done!

I would love to see your results! If you would like to share just send them to me: sherenassweettreats@yahoo.com

Monday, March 25, 2013

Kiss My Pink PTU Tut

Supplies Needed:
PSP: I used PSP9, but any version should do.
 Kit of Choice: I used Kiss My Pink by Tasha's Playground. You can find where to buy it here.
 Tube of Choice: I used a tube by Ismael Rac. You can  find it here. Please do not use without the proper license!
Mask of Choice: I used WSL84 here.
 Font of Choice: I used MTF Chubb. You can get it here.
 
Let's get started!
 
New canvas 600X600
C/P cityscape
Resize 65%
C/P tube
Resize if needed
C/P wire
Resize 65%
C/P disco ball
Resize 65%, Duplicate & Mirror
C/P bag
Resize 35%
C/P frame5
Resize 35% & free rotate right 110
Use freehand tool to select empty area inside of frame
Add new layer below frame layer
Floodfill with color or gradient of choice (I used a pink gradient)
C/P tube again
Free rotate right 20 & resize so the head fits inside frame
Mirror
Erase any parts showing outside of frame
C/P shot glass
Resize 35%
C/P drink2
Resize 35%

DS all elements

C/P paper of choice (I used paper2)
Apply mask & merge group
Resize 90%
 
Crop & resize
Add name & copyright
Save as .png & you're done!

I would love to see your results! If you would like to share just send them to me: sherenassweettreats@yahoo.com

Easter Melody PTU Tut

Supplies Needed:
PSP: I used PSP9, but any version should do.
 Kit of Choice: I used Easter Melodies by Eclipse Creations. You can find where to buy it here.
 Tube of Choice: I used a tube by Ismael Rac. You can  find it here. Please do not use without the proper license!
 Font of Choice: I used Tabitha. You can get it here.
 
Let's get started!
 
 New canvas 600X600
C/P EC_EM_Frame
Resize 65%
Select inside with magic wand
Expand by 3
C/P paper of choice (I used EC_EM_p11)
Invert selection & delete
Deselect
C/P EC-EM_Rings
Resize 85% & move below paper layer
C/P EC_EM_Grass3
Resize 70% & position at bottom of frame
C/P tube
Resize if needed

C/P any elements you want
I used the following:
EC_EM_Rainbow1- move below frame & erase any parts showing outside of frame
EC_EM_BirdHouse- resize 65%
EC_EM_Mushroom2- resize 45% & mirror
EC_EM_EasterBasket- resize 60%
EC_EM_EasterChick- resize 25%
EC_EM_Butterfly2- resize 25% free rotate right 20
EC_EM_Butterfly3- resize 25% free rotate left 20

DS everything except the paper & rainbow layers

Crop & resize
Add name & copyright
Save as .png & you're done!

I would love to see your results! If you would like to share just send them to me: sherenassweettreats@yahoo.com

Thursday, March 14, 2013

Steampunker FTU Tut

Supplies Needed:
PSP: I used PSP9, but any version should do.
 Kit of Choice: I used Steam Punker by Gimptastic Scraps. You can find it here.
 Tube of Choice: I used a tube by Ed van der Linden called SteamPunk Babe. You can get it here. Please do not use without the proper copyright!
Mask of Choice: I used Vix_Mask380 here.
 Font of Choice: I used Steamwreck. You can find it here.
Let's get started!
New canvas 600X600
C/P Frame4
Resize 65%
Select inside frame with magic wand
Expand by 3
C/P paper of choice (I used Paper6)
Resize 65%
Invert selection on paper layer & Delete
Deselect
DS frame
C/P tube
Resize as needed
Duplicate
On duplicate layer Gaussian Blur 3
Change blend mode to Soft Light
DS original tube layer
Merge tube layers together
Erase any parts showing below frame so it looks like she is coming out of the top
C/P elements of choice
I used the following:
Trunk- resize 45%
Gear2- resize 45%
Phone- resize 55%
Lock- resize 45%
Key- resize 35% free rotate 65 right & mirror
Watch- resize 45%
Glasses- resize 35% free rotate 65 left
Shoe- resize 45%
Scissors- resize 45%
DS elements
C/P paper of choice above background layer (I used Paper5)
Apply mask & merge group
Resize 90% free rotate 45 right
Merge down & add noise 35 Gaussian monochrome checked
Use the selection tool and select the bottom of the mask that shows below the elements
Delete & deselect
Crop & resize now

Add name & copyright
Save as a .png & you're done!
I would love to see your results! If you would like to share just send them to me: sherenassweettreats@yahoo.com  

Friday, March 1, 2013

Irish Lass PTU Tut

PSP: I used PSP9, but any version should do.
 Kit of Choice: I used Irish Lass by Irish Bitch Designs. You can buy it here.
 Tube of Choice: I used a tube by Ismael Rac. You can get it here. Please do not use without the proper copyright!
Mask of Choice: I used AR315_CMC_mask52 here.
 Font of Choice: I used American Uncial Normal. You can find it here.
 
Let's get started!
 
 New canvas 600X600
C/P IBD_IL_Frame2
Resize 65%
Select inside frame with magic wand
Expand by 3
C/P paper of choice (I used IBD_IL_Paper6)
Invert selection & delete on paper layer
Deselect
C/P closeup tube (I mirrored mine.)
Resize if needed
Erase any parts showing on the outside of the frame
Change blend mode to Luminance(Legacy) & lower opacity to 35

C/P tube
Resize if needed
Position to right of frame
DS tubes & frame layers

C/P elements of choice
I used the following:
IBD_IL_Bow1- resize 35%
IBD_IL_Beer- resize 25%
IBD_IL_Harp- resize 40%
IBD_IL_Hat- resize 25%
IBD_IL_Butterfly1- resize 15% Duplicate twice & arrange
DS elements

C/P paper of choice (I used IBD_IL_Paper7)
Apply mask & merge group
Resize 90% & again 95%

Crop & resize now

Add name & copyright
Save as a .png & you're done!
 
I would love to see your results! If you would like to share just send them to me: sherenassweettreats@yahoo.com  

Monday, February 18, 2013

Bleeding Heart PTU Tut


PSP: I used PSP9, but any version should do.
 Kit of Choice: I used Cherish by Gemini Creationz. You can buy it here.
 Tube of Choice: I used a tube by Anna Marine. You can get it at CDO here. Please do not use without the proper copyright!
Mask of Choice: I used MB and SW Mask 34 here.
 Font of Choice: I used MTF Under Your Skin. You can find it here.

Let's get started!

New canvas 600X600
C/P gemini_bleedingheart_e43
Resize 80%
C/P gemini_bleeingheart_p1
Move behind frame layer
Select inside frame with magic wand
Expand by 3
Invert selection & delete on paper layer
DS frame

C/P tube resize if needed
DS tube Erase any parts that show below the frame
You want to make it look like the tube is coming out the top of the frame

C/P elements of choice
I used the following:
SkyScraps-Toxic-Splatter2 copy- resize 35% Duplicate & Mirror
gemini_bleedingheart_e6- resize 45%
gemini_bleedingheart_e54- resize 30% Duplicate & Mirror
gemini_bleedingheart_e53- resize 35% Duplicate & Mirror
gemini_bleedingheart_e60- resize 45% free rotate left 90 Duplicate & Mirror
gemini_bleedingheart_e51- resize 25% free rotate right 30
DS elements

C/P gemini_bleeingheart_p3
Apply mask & merge group
Resize 90%

Crop & resize now

Add name & copyright
Save as a .png & you're done!
I would love to see your results! If you would like to share just send them to me: sherenassweettreats@yahoo.com