Supplies Needed:
PSP: I used PSP9, but any version should do.
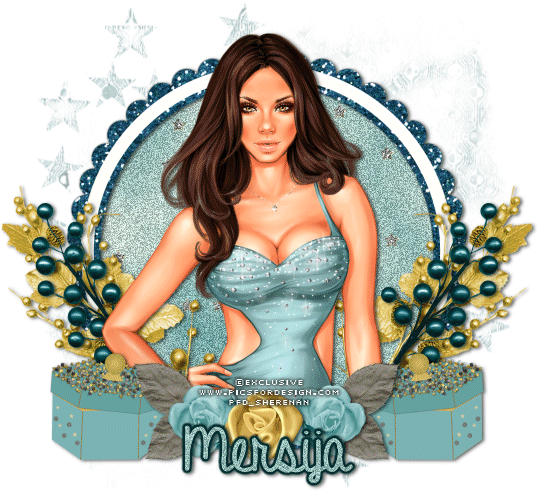
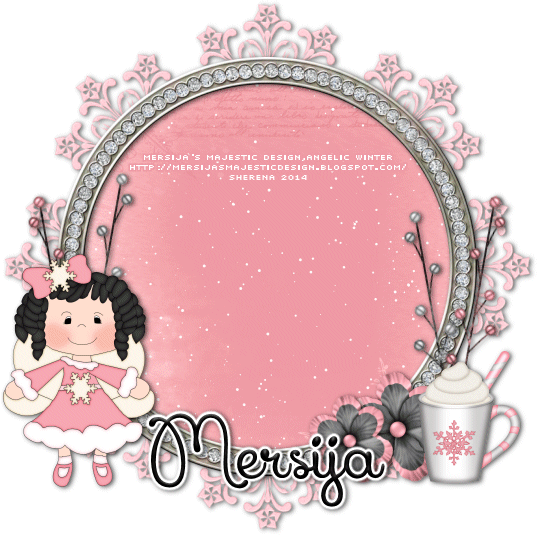
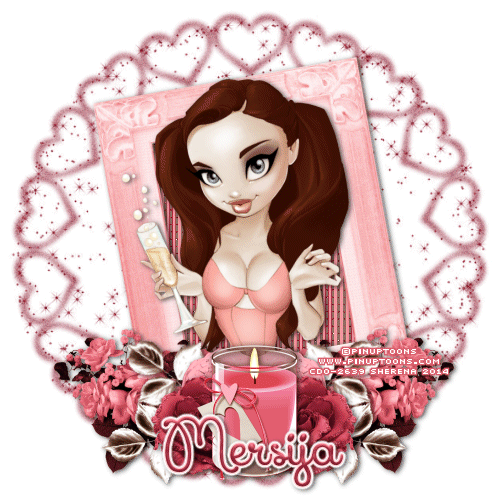
Kit of Choice: I used Be Mine by Mersija's Majestic Design. You can find where to buy it here.She also has a mini kit by the same name.
Tube of Choice: I used a tube by PinUp Toons. You can find it here. Please do not use without the proper license!
Mask of Choice: I used Suz heartmask2 here.
Font of Choice: I used I used Xiomara. You can find it here.
Animation Shop
Let's get started!
New canvas 600X600
C/P MMD_BeMine_frame2- resize 10%; free rotate left 10
Select inside with magic wand
Expand by 5
Add new layer below frame layer
C/P paper of choice into selection
Deselect
C/P tube
Resize if needed
Erase any parts showing at bottom of frame
C/P elements of choice
I used the following:
MMD_BeMine_flowers bunch1- resize 35%; duplicate & mirror
MMD_BeMine_leaves1- resize 10%; erase the top leaves; duplicate, flip & arrange using raster deform tool; merge down; duplicate & mirror
MMD_BeMine_rose glitter- resize 25%; duplicate & mirror
MMD_BeMine_rose2- resize 7%; duplicate & mirror
MMD_BeMine_candle- resize 10%
Add DS
Add new layer above background layer
Floodfill with color of choice
Add noise
Apply mask & merge group
Resize 85%, duplicate & merge down
Crop & resize
Add name & copyright
To animate:
1. Hide the background & mask layers
2. Merge visible
3. Hide merged layer & unhide background layer
4. Copy merged & paste into Animation Shop (AS)
6. Back in PSP, unhide mask & select
7. Copy & paste as a new animation in AS
8. Paste after current selection so you have 2 mask layers
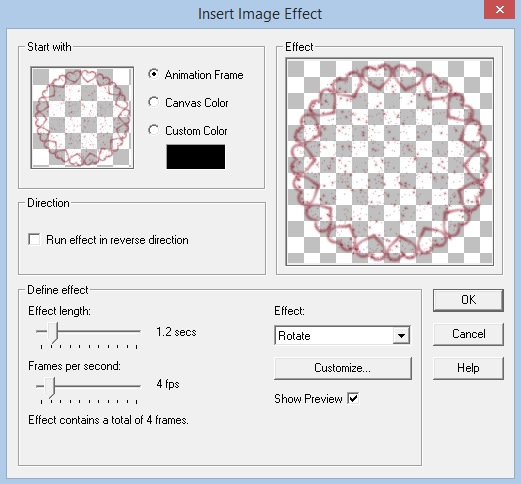
9. Select frame 1 of the mask layers & insert image transition with these settings:
C/P MMD_BeMine_frame2- resize 10%; free rotate left 10
Select inside with magic wand
Expand by 5
Add new layer below frame layer
C/P paper of choice into selection
Deselect
C/P tube
Resize if needed
Erase any parts showing at bottom of frame
C/P elements of choice
I used the following:
MMD_BeMine_flowers bunch1- resize 35%; duplicate & mirror
MMD_BeMine_leaves1- resize 10%; erase the top leaves; duplicate, flip & arrange using raster deform tool; merge down; duplicate & mirror
MMD_BeMine_rose glitter- resize 25%; duplicate & mirror
MMD_BeMine_rose2- resize 7%; duplicate & mirror
MMD_BeMine_candle- resize 10%
Add DS
Add new layer above background layer
Floodfill with color of choice
Add noise
Apply mask & merge group
Resize 85%, duplicate & merge down
Crop & resize
Add name & copyright
To animate:
1. Hide the background & mask layers
2. Merge visible
3. Hide merged layer & unhide background layer
4. Copy merged & paste into Animation Shop (AS)
6. Back in PSP, unhide mask & select
7. Copy & paste as a new animation in AS
8. Paste after current selection so you have 2 mask layers
9. Select frame 1 of the mask layers & insert image transition with these settings:
You should now have 6 mask layers
10. On your first animation (mask) Copy & paste after selected frame until you have 6 frames
11. On mask animation, Select All & Copy
12. Back on background animation, Select All & Paste into current selection
13. Back in PSP, hide everything but the top merged layer
14. Copy merged & paste in AS as a new animation
15. Paste after current selection until you have 6 frames
16. Select All & Copy
17. Back on original animation, Select All & Paste into current selection
18. Change frame properties to 20
19. View animation & save
I would love to see your results! If you would like to share just send them to me: sherenassweettreats@yahoo.com