Wednesday, December 19, 2012

Gorjuss Snow PTU Tut


Supplies Needed:
PSP: I used PSP9, but any version should do.
 Kit of Choice: I used Little Owl by Gimptastic Scraps. You can purchase it here.
 Tube of Choice: I used a tube by Suzanne Woolcott. You can find it here. Please do not use without the proper license!
Mask Of Choice: I used HorsePlay's Pasture Mask 9 here.
 Font of Choice: I used Sacramento here.
(Optional) Snow animation. I used one by Lovey here.
(Optional) Animation Shop 3
Let's get started!
New canvas 600X600
C/P Frame4 resize 70%
Select inside with magic wand expand by 5
C/P paper of choice (I used Paper1.)
Invert selection & delete. Deselect.

C/P any elements you want
I used the following:
Snow3- duplicate & merge down
Tree- resize 45%
Bucket- resize 35%
Snowballs- resize 35% duplicate & resize 65% duplicate again & arrange duplicates in bucket. Erase any part outside of bucket so it looks like the snowballs are in the bucket.
BirdHouse- resize 35%
Bird1- resize 25%
Bag- reisze 45%

C/P tube reisze if needed

Add D/S where you want

C/P paper of choice (I used Paper3.)
Apply mask & merge

Use raster deform to adjust your mask to your liking

Add name & copyright
If you don't want to animate save as a .png & you're done!
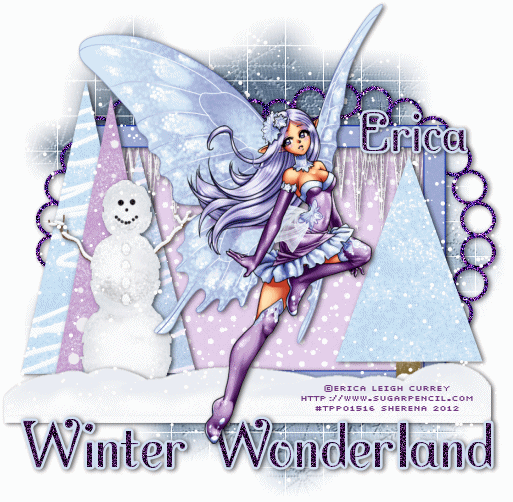
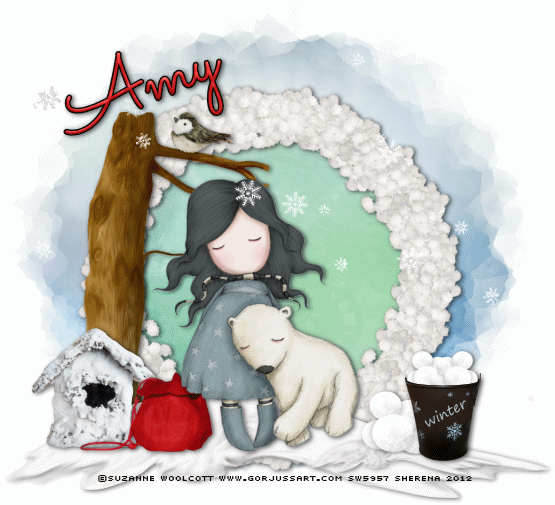
Here is mine without animation:


(Optional) To animate:
Hide name & copyright
Copy merged & paste in Animation Shop
C/P until you have the same number of frames as your animation (Mine has 40 frames.)
On your snow animation select all & copy
Back on your siggy select all & paste into selection

In PSP unhide name & copyright & hide everything else
Copy merged & paste in Animation Shop
C/P until you have the same number of frames as your animation (Mine has 40 frames.)
Select all & copy
Back on your siggy select all & paste into selection

View & save
I would love to see your results! If you would like to share just send them to me: sherenassweettreats@yahoo.com 

Monday, December 17, 2012

Chocolate Christmas PTU Tut

Supplies Needed:
PSP: I used PSP9, but any version should do.
 Kit of Choice: I used Chocolate Christmas by Gimptastic Scraps. You can buy it here.
 Tube of Choice: I used an FTU tube by Cris Ortega. I got this through a tube sharing group. You can check out other Cris Ortega tubes here.
Mask Of Choice: I used snowflake2 by Faith. You can get it here.
 Font of Choice: I used Saginaw. You can find it here.
Let's get started!
 Open template
Delete credits & words layers
Canvas Size- 525X525 centered

Replace each template layer with paper, element or color of choice
I used the following:
1-Manual Color Correction to #150c0a Add Noise 45& Gaussian Monochrome checked
2- Paper3
3-Manual Color Correction to #150c0a Add Noise 45& Gaussian Monochrome checked
4- Paper3
5- Paper8
6- Paper5
7- Paper1
8- Paper4
9- Paper4
10- Paper8
11- Paper5
12- Paper5
13- Paper10
I added a gradient glow to some of my layers

C/P tube resize if needed
C/P tube again & place in bottom circle
Duplicate & mirror Place in top circle
Erase any part of the tubes that show outside of circles

C/P any elements you want
I used the following:
Drips- resize 45%
Sled- resize 65%
Bear3- resize 45%
Gift- resize 45%
TrayOfCookies- resize 45%
Mug- resize  45%
Lollipop- resize 35%
CandyCane- resize 25% free rotate left 30
Candy- resize 20% Duplicate a few times & arrange Use the Raster Deform tool to rotate.

Apply D/S where desired

C/P paper of choice (I used Paper6.)
Apply mask & merge group

Crop & resize
Add name, wordart & copyright
Save as .png & you're done!

I would love to see your results! If you would like to share just send them to me: sherenassweettreats@yahoo.com

Monday, December 3, 2012

Winter Wonderland FTU Tut

Supplies Needed:
PSP: I used PSP9, but any version should do.
 Kit of Choice: I used Glisten by imagic reflections. You can find it here.
 Tube of Choice: I used a tube by Erica Leigh Currey. You can find it here at The PSP Project. Please do not use without the proper license!
Mask Of Choice: I used WSL_Mask84 here.
 Font of Choice: I used Acorn Swash. It is a PTU font.
(Optional) VDL Snowflake here
(Optional) Animation Shop 3
Let's get started!
New canvas 600X600
C/P Frame_09 resize 65%
Select inside frame with magic wand expand by 5
C/P paper of choice (I used Paper_11 resized 65%)
Invert selection & delete
Deselect & move paper below frame

C/P elements of choice
I used the following:
Icicles resized 65% & brightened
Snowman resized 65%
Tree_01 resized 60%
Tree_03 resized 65%
Tree_05 resized 60%
FallenSnow_03 reiszed 60%
Tree_07
Frame_03 resized 65% duplicated & mirrored

(Optional) I recolored everything to make it a little brighter.

C/P tube resize if needed

D/S everything

C/P paper of choice (I used p07_KOW_Schnegge)
Apply mask & merge group

Crop & resize now

Add name, words & copyright
To Animate:
Add 3 new layers
Rename them Snow 1, Snow 2 & Snow 3
On Snow 1 apply VDL Snowflakes with these settings:
Amount-65 Minimum size-0 Maximum size-12 Hardness-100 Tranparency-0 Snow color- Basic Snow Random Seed-0
Apply the same settings to Snow2 & Snow3, changing random seed each time
Hide Snow2 & Snow3
Copy Merged and paste into Animation Shop
Back in PSP hide Snow1 & unhide Snow2
Copy Merged and Paste After Current Frame in Animation Shop
Back in PSP hide Snow2 & unhide Snow3
Copy Merged and Paste After Current Frame in Animation Shop
In Animation Shop Select All
Change the frame properties to 15 & Animation Properties to Opaque White

View & save

Friday, November 30, 2012

Snow Friends PTU Tut

Supplies Needed:
PSP: I used PSP9, but any version should do.
 Kit of Choice: I used Sweet Snow Friends by Wicked Princess Scraps. You can find where to buy it here.
 Tube of Choice: I used a tube by Ismael Rac. You can find it here. Please do not use without the proper license!
Mask Of Choice: I used SST-Mask10 here.
 Font of Choice: I used P22 Corinthia. It is a PTU font.
Let's get started!
New canvas 600X600
C/P WP_SSP_RECTANGLEFRAME Resize 65%
Select inside frame with magic wand & expand by 3
C/P paper of choice (I used WP_SSP_PP3) & resize by 65%
Invert selection & delete
Deselect

C/P tube resize if needed

C/P any elements you want
I used the following:
WP_SSP_FLAGS resized 45%
WP_SSP_MOOSESNOWBALLS resized 35% & mirrored
WP_SSP_BUNNYSNOWMAN resized 35%
WP_SSP_BEADEDWIRE resized 85% dulpicated, mirrored & flipped
WP_SSP_dangles resized 45%

D/S desired layers

C/P paper of choice (I used WP_SSP_PP4.)
Apply mask & merge group
I used the deform tool to stretch mine.

Crop & resize now

Add name, words & copyright

Save as a .png & you're done!

I would love to see your results! If you would like to share just send them to me: sherenassweettreats@yahoo.com

New CT!

I'm very happy to announce I've been accepted on another creative team. I will be writing CT tuts using products from The PSP Project. They have scrapkits, tubes and more! I'll have my first tut for them up in a few.

Wednesday, November 28, 2012

New Mask

I've made a new mask. If you would like it just click on it to make it actual size then right click and save. If you use it in a tutorial please send them here to get it. Thanks!

Give Me the Cookies FTU Tut

Supplies Needed:
PSP: I used PSP9, but any version should do.
 Kit of Choice: I used Ginger Christmas by Gimptastic Scraps. You can find it here.
 Tube of Choice: I used a tube by Elias Chatzoudis. You can find it here. Please do not use without the proper license!
Mask Of Choice: I used AR315_CMC_mask28_Winter here.
 Font of Choice: I used Amienne. It is a PTU font.
(Optional) Eye Candy 5: Textures

Let's get started!

New canvas 600X600
C/P Frame2 Resize 70%
Select inside frame with magic wand
Modify expand by 3
C/P paper of choice as new layer (I used Paper5.)
Invert selection & delete Deselect
Move below frame in layer palette
C/P your tube Resize if necessary

Add any elements you want
I used the following:
Tree resized 75%
LightString resized 45%
Bag resized 70%
Holly resized 45%
Cupcake resized 35%
CandyCane resized 35%
Cookie1 resized 35% & duplicated
Cookie2 resized 35% & duplicated

(Optional) Select your ellipse tool
Set your background color to #cc1f29 foreground color null
Draw out an oval slightly wider than your tag
Horizontal center & convert to raster
Apply Eye Candy 5:Textures Animal Fur
Settings- Dalmation, Low Coverage
Pattern- Base Color: #cc1f29 Spot Color: #000000
Leave everything else the same
*If you would like the "rug" I made just send me an email.*

Add D/S to everything

C/P paper of choice as new layer (I used Paper6.)
Apply mask & merge group

Crop & resize now

Add name, wordart & copyright

Save as .png & you're done!

I would love to see your results! If you would like to share just send them to me: sherenassweettreats@yahoo.com

Sunday, November 18, 2012

Winter Snowfall PTU Tut

Supplies Needed:
PSP: I used PSP9, but any version should do.
 Kit of Choice: I used Winter Woods by Gimptastic Scraps. You can buy it here.
 Tube of Choice: I used a tube by PinupToons. You can find it here. Please do not use without the proper license!
Template of Choice: I used TonyaDebCollab4 here.
Mask Of Choice: I used WSL_Mask84 here.
 Font of Choice: I used Janda Cheerful Script here.
(Optional) VDL Snowflake here
(Optional) Animation Shop 3

Let's get started!
 Open template
Delete credits & wordart layers
Replace each layer with paper, color or element of your choice
I used the following:
Copy of Vector 1- Frame3 (I only used the right frame.)
Raster 3- Paper9 resized 45%
Circle Frame- Frame1
Circle- Paper9
Rounded Rectangle- Paper10
Raster 1- Paper7
Square 2- Paper2
Raster 2- Paper8
Square 1- Paper2

Add any elements you want
I used the following:
Tree
Bird- resized 45%
Sign
WoodenDeer- resized 55%
Snow- duplicated a few times and arranged at bottom
Nuts2- resized 20% free rotate left 65

C/P tube resize if needed
C/P closeup of tube in small frame
Delete anything that shows outside of frame
Change blend mode to Luminance(Legacy) & opacity to 75%

Add D/S where desired

Add a new layer as the bottom layer
Floodfill with color of choice (I used #7f2001)
Apply mask & merge group

Crop & resize if you want
Add your name & copyright

If you don't want to animate save as a .png and you're done

To Animate:
Add 3 new layers
Rename them Snow 1, Snow 2 & Snow 3
On Snow 1 apply VDL Snowflakes with these settings:
Amount-130 Minimum size-0 Maximum size-8 Hardness-100 Tranparency-0 Snow color- Basic Snow Random Seed-0
Apply the same settings to Snow2 & Snow3, changing random seed each time
Hide Snow2 & Snow3
Copy Merged and paste into Animation Shop
Back in PSP hide Snow1 & unhide Snow2
Copy Merged and Paste After Current Frame in Animation Shop
Back in PSP hide Snow2 & unhide Snow3
Copy Merged and Paste After Current Frame in Animation Shop
In Animation Shop Select All
Change the frame properties to 15 & Animation Properties to Opaque White

View & save

Here is my animated version
I would love to see your results! If you would like to share just send them to me: sherenassweettreats@yahoo.com 

Saturday, November 10, 2012

Freezin' Season PTU Tut

Supplies Needed:
PSP: I used PSP9, but any version should do.
 Kit of Choice: I used Season to Be Freezin by Gimptastic Scraps. You can buy it here.
 Tube of Choice: I used a tube by Ismael Rac. You can find it here. Please do not use without the proper license!
Mask Of Choice: I used WSL_Mask33 here.
 Font of Choice: I used The Mocking Bird here.
Let's get started!
 New canvas 600X600
C/P Frame5
Resize 70%
Select inside frame with magic wand & expand by 5
C/P paper of choice (I used Paper4.)
Invert selection & delete
Deselect
C/P Snow
Resize 70% & arrange at bottom of frame
C/P tube
Resize if needed

Add any elements you want
I added the following:
Tree1- resize 70%
Owl2- resize 50%
BulbString- resize 50%
Mug- resize 30% & mirror
Present- resize 30%
Wordart- resize 85%

D/S everything

C/P paper of choice (I used Paper10.)
Apply mask & merge group
Resize 95%

Crop & resize now if you plan on it.

Add name & copyright.

Save as .png & you're done!

I would love to see your results! If you would like to share just send them to me: sherenassweettreats@yahoo.com

Winter Beauty PTU Tut

Supplies Needed:
PSP: I used PSP9, but any version should do.
 Kit of Choice: I used Winter by Country Princess Scraps. You can buy it here.
 Tube of Choice: I used a tube by PinUpToons. You can find it here. Please do not use without the proper license!
Mask Of Choice: I used ST-Mask5 here.
 Font of Choice: I used Janda Cheerful Script here.
 
Let's get started!
  
New canvas 600X600
C/P el 41
Resize 65%
Select inside wreath with magic wand & expand by 15
C/P paper of choice (I used pp3.)
Invert & delete
Deselect

C/P el 21
Resize 35% & move to bottom left of wreath
Duplicate & mirror
Merge duplicate down
Move to bottom in layer palette

C/P el 74
Resize 45%
Duplicate twice & arrange at bottom of fence
Merge the 3 snow layers together

C/P tube
Resize if needed

Add any elements you want
I added the following:
el 16- resize 45% duplicate
el 13- resize 20%
el 73- resize 45%
el 51- resize 45%

D/S all layers

C/P paper of choice (I used pp 22.)
Apply mask & merge group
Use raster deform tool to stretch to about half the size
Duplicate, flip & mirror

Crop & resize if you want

Add name & copyright
 
Save as .png & you're done!

I would love to see your results! If you would like to share just send them to me: sherenassweettreats@yahoo.com

Monday, November 5, 2012

Save a Turkey FTU Tut

Supplies Needed:
PSP: I used PSP9, but any version should do.
 Kit of Choice: I used Turkey Day Protest by Gimptastic Scraps. You can find it here.
 Tube of Choice: I used a tube by Ismael Rac. You can find it here. Please do not use without the proper license!
Mask Of Choice: I used Vix_BigMask018 here.
 Font of Choice: I used Janda Elegant Handwriting here and MTF Chubb here.

Let's get started!

New canvas 600X600
C/P Frame5. Resize 70%
Select inside frame with magic wand. Expand by 3.
Add a new layer below the frame layer. C/P paper of choice into selection. (I used Paper5.)
Deselect.
C/P tube. Resize if needed & arrange in center. Delete any parts showing BELOW frame.
Add any elements you want.
I added the following:
ProtestTurkey1- resize 40%
Sign- resize 40%
Pan- resize 40%
Pig- resize 40%
Silverware- resize 25%
RecipeCards- resize 40% free rotate left 13
BBQSauce- resize 40%
BaconBeer- resize 40%
PorkSoda- resize 40%

Add D/S where you want

C/P paper of choice. (I used Paper9.)
Apply mask & merge group.

Crop & resize now if you plan on it.

Add name, text & copyright.

Save as .png & you're done!

I would love to see your results! If you would like to share just send them to me: sherenassweettreats@yahoo.com

Sunday, November 4, 2012

Flourishing Fall FTU Tut

Supplies Needed:
PSP: I used PSP9, but any version should do.
 Kit of Choice: I used Flourishing Fall by Gimptastic Scraps. You can find it here.
 Tube of Choice: I used Autumn Day by Alex_Prihodko. You can find it here at PicsforDesign. Please do not use without the proper license!
Mask Of Choice: I used SST-Mask6 here.
 Font of Choice: I used Janda Elegant Handwriting here.
Plugin(optional): Alien Eye Candy 5: Texture Animal Fur
Let's get started!
 New canvas 600X600
C/P Frame5 resize 65%
Move to right duplicate & mirror.
Select inside left frame on duplicate
Expand by 3 C/P paper of choice (I used Paper2.)
Invert Selection & delete. Deselect.
Repeat with left frame on original. Make sure your paper layers are below the frame.
Choose a different paper (I used Paper8.) & repeat for right frames.

Set your foreground color to #574c1d and your background color to #8e832d
Make a gradient with your background color Linear Angle:0 Repeat:0. Hide the foreground color.
Select your ellipse tool & and draw an oval slightly longer than your frames.
Objects>Align>Center in Canvas. Convert to Raster.
Alien Eye Candy:Textures Animal Fur- Settings: Factory Default Pattern: Original Image
Image Flip. Move down to bottom of frames.
If you do not have AEC5, here is the grass I made. Just click to make it full size. Then right click & save as.

C/P your tube. Resize if needed.
C/P your tube again. Move below frame. Position & erase any parts showing outside of frame. Do this for all 4 frames.
Change Blend Mode on each tube except the original. (I used Luminance(Legacy) & Soft Light.)

Add any other elements you want.
I used the following:
ArtStuff resize 45%
Bird resize 30%
Flower4 resize 30%, duplicate & mirror
DandelionPuff resize 30%, duplicate 2X & arrange
Flower5 resize 25%, duplicate 2X & arrange
Butterflies resize 25%

Add DS to desired layers

C/P paper of choice (I used Paper10.)
Apply mask & merge group.

Crop & resize(if desired.)

Add name, text & copyright.

Save as .png & you're done!

I would love to see your results! If you would like to share just send them to me: sherenassweettreats@yahoo.com

Wednesday, October 24, 2012

Turkey Time Kit FTU


I've created a Thanksgiving kit. I used some really cute clipart I got from Sweet N Sassy Clipart
Click the preview to download. If you download, please leave a comment.
 I would love to see anything you make with my kit! If you would like to share just send them to me: sherenassweettreats@yahoo.com

Evening Dew FTU Tut

Supplies Needed:
PSP: I used PSP9, but any version should do.
 Kit of Choice: I used Evening Dew by Gimptastic Scraps. You can find it here.
 Tube of Choice: I used a tube by Anna Liwanag. I got this tube from MPT. You can now purchase it here. Please do not use without the proper license!
Mask Of Choice: I used WSL Mask236 here.
 Font of Choice: I used Snow White. You can get it here.
C/P= copy & paste
D/S= drop shadow 
Let's get started!

new canvas 600X600
c/p WaterDroplets resize 85%
c/p Frame1 resize 65%
c/p paper of choice behind frame (I used Paper4 & resized

65%.)
select inside frame with magic wand
expand by 3
on paper layer invert selection & delete
select none
c/p Heart resize 65%
duplicate & flip
merge down & place at bottom left of frame
duplicate 3 more times & arrange at bottom of frame to look like grass
c/p tube to right of frame
c/p closeup under frame
mirror if needed & erase any parts showing outside of frame
change blend mode to luminance (legacy) & opacity to 65
c/p any elements you want
I used the following:
Frog-resize 35% & mirror
FeatherJar- resize 35%
Flower2- resize 20% duplicate resize 85%
Flower3- resize 20% duplicate resize 85%

apply d/s to everything but paper

add new layer & floodfill with color of choice (I used #8f5f88 & added noise.)
apply mask & merge group
resize 95%

crop & resize now
add name & copyright
Save as .png & you're done!

I would love to see your results! If you would like to share just send them to me: sherenassweettreats@yahoo.com

Friday, October 5, 2012

Gorjuss Fall FTU Tut

Supplies Needed:
PSP: I used PSP9, but any version should do.
 Kit of Choice: I used Falling for Steampunk by Gimptastic Scraps. You can find it here.
 Tube of Choice: I used a tube by Suzanne Woolcott. You can find it here. Please do not use without the proper license!
Mask Of Choice: I used BD-Mask4 here.
 Font of Choice: I used Neuropol. You can get it here.
C/P= copy & paste
DS= drop shadow

Let's get started! 
New canvas 600X600
Activate Rectangle tool
Set foreground to color or paper of choice & background to null Line Style:Solid Stroke Width:20
Draw out a rectangle
Objects Align Center in Canvas
Convert to raster
Apply a bevel to it
I used Eye Candy 5 Impact: Bevel, but the Inner Bevel that comes with PSP willwork.
C/P paper of choice & move below frame you just created
Select inside frame with magic wand & expand by 3
Invert Selection & press delete on paper layer
Deselect

C/P elements of choice
I used the following:
Buckets- resize 45%
WoodWreath- resize 35%
Bird- resize 35%
Acorns- resize 45%
Butterfly- resize 20% free rotate right 20
Wood- resize 65% duplicate, mirror & move down
Duplicate again & flip Arange
Stick- resize 65%
SunflowerCog- resize 20% Duplicate a couple times & place on stick
Cog 3- resize 35%
Cog 5- resize 30%
Seeds- resize 20%

DS desired layers

C/P tube
Resize if needed & DS

C/P paper of choice (I used Paper5.)
Apply mask & merge group

Crop & resize if desired

Add name/text & copyright

Save as .png & you're done!

I would love to see your results! If you would like to share just send them to me: sherenassweettreats@yahoo.com

Treats No Tricks PTU Tut

Supplies Needed:
PSP: I used PSP9, but any version should do.
 Kit of Choice: I used Happy Emoween by Country Princess Scraps. You can purchase it here.
 Tube of Choice: I used a tube by Lia. This is an FTU tube I got through a tube sharing group.
Template of Choice: I used AR315_Template70 here.
Mask Of Choice: I used SST-Mask7 here.
 Font of Choice
c/p= copy & paste
ds= drop shadow 
 
Let's get started!

Open template
Delete copyright & word layers
Resize 525X444
Canvas size 600X600

Replace each layer with color, paper or element of choice
I used the following:
shape 2- delete
shape 1- delete
teal rectangle- paper 2
glitter rectangle- #741ea7 add noise 35% gaussian monochrome checked
black rectangle- leave black
teal circle 4- paper 27
teal circle 3- paper 27
teal circle 2- paper 27
teal circle 1- paper 27
glitter circle 4- #fdcc03
glitter circle 3- #fdcc03
glitter circle 2- #fdcc03
glitter circle 1- #fdcc03 add noise 35% gaussian monochrome checked
black circle 4- leave black
black circle 3- leave black
black circle 2- leave black
black circle 1- leave black
diamond circles- #741ea7

c/p tube
duplicate
on duplicate gaussian blur 3
change blend mode to soft light
ds original

add elements of choice
I used the following:
element 49- resize 65%
element 11- resize 20%
element 10- resize 15%
element 38- resize 15%
element 5- resize 15% free rotate left 90
element 36- resize 15%

ds all desired layers

add paper or color of choice
apply mask & merge group

crop & resize if desired
add name/text & copyright

Save as .png & you're done!
I would love to see your results! If you would like to share just send them to me: sherenassweettreats@yahoo.com

New Masks #5-9

I was goofing off the other day and ended up making more masks.

If you would like them just click on the one you want to make it actual size then right click and save. If you use it in a tutorial please send them here to get it. Thanks!


Tuesday, September 25, 2012

Dead of Night FTU Tut

Supplies Needed:
PSP: I used PSP9, but any version should do.
 Kit of Choice: I used Dead of Night by Gimptastic Scraps. You can find it here.
 Tube of Choice: I used a tube by Anna Marine. I got this when she was with CILM. You can now find it at CDO. Please do not use without the proper license!
Mask Of Choice: I used 2nq5ftx here.
 Font of Choice: I used Raphael. It is a PTU font.
c/p= copy & paste
ds= drop shadow

Let's get started!

new canvas 600X600
c/p Frame3
resize 65%
c/p paper of choice (I used Paper6.)
resize 65%
select inside frame with magic wand
expand 5
on paper layer- invert & delete
deselect
c/p Moon
resize 35% & move below frame
erase anything showing outside of frame
c/p Necklace
resize 35% & place in center of moon
erase anything showing outside of frame
c/p tombstone
resize 35% & place inside frame
duplicate & resize 80%
Move up & to left
Copy & paste SkullPile
Resize 35% & place inside frame in between tombstones
Copy & paste GhostMan
Resize 45% & place in front of tombstone on right
Adjust- Brightness & Contrast
Set Brightness at 50 & Contrast at 5 to lighten him a little
c/p BlackCat
Resize 45% mirror & place at bottom right side of frame
c/p Tree
resize 65%
move to right side of frame
duplicate & mirror
merge down & move to bottom of layer palette
c/p tube
resize & mirror if needed

c/p any other elements you want
I used the following:
BackRose1- resize 30% duplicate & mirror
Rose- resize 28% duplicate & mirror
Candles- resize 28%

ds desired layers

c/p paper of choice (I used Paper1.)
Apply mask & merge group
resize 90%

crop & resize now if you plan on it
Add name, text & copyright
Save as .png & you're done!
I would love to see your results! If you would like to share just send them to me: sherenassweettreats@yahoo.com
 Let's get

Monday, September 17, 2012

Tooth Fairy Visit FTU Tut

Supplies Needed:
PSP: I used PSP9, but any version should do.
 Kit of Choice: I used Tooth Fairy Time by Gimptastic Scraps. You can find it here.
 Tube of Choice: I used the tubes that came with the kit. They are so cute!
Mask Of Choice: I used Misfitsmask#5madebyLNM-12 here.
 Font of Choice: I used Portfolio. It is a PTU font.
 Let's get started!

New canvas 600X600
Copy & paste Frame1
Resize 45% move to left & up slightly
Copy & paste Paper6
Resize 65% move behind frame
Select inside frame with magic wand
Expand by 5
On paper layer invert &delete
Deselect
Copy & paste StarScatter
Resize 35% move behind frame
Duplicate & resize 85%
Move up
Duplicate one more time
Resize 80% & move up
Erase any stars that show outside of frame
Copy & paste Bed
Resize 65% & mirror
Copy & paste Boy
Resize 50% & place beside bed
Copy & paste Toy1 & Toy2
Resize both 25% & place under bed
Copy & paste Tooth
Resize 8% & 75%
Free rotate left 45 & place on bed
Copy & paste Toothpaste
Resize 25% & place by boy
Copy & paste Toothbrush
Resize 20% & place by toothpaste
Copy & paste ToothFairy
Resize 20% & place by tooth
Copy & paste Book
Resize 35%

Select your Ellipse Tool
Foreground:Null Background:Pattern Paper 1
Draw out an oval and place under everything so it looks like a rug (It needs to be right above frame in layer palette.)
Convert to raster

Drop shadow everything

Add paper of choice (I used Paper2.)
Apply mask & merge group

Crop & resize now

Add name, text & copyright

Save as a .png & you're done!

I would love to see your results! If you would like to share just send them to me: sherenassweettreats@yahoo.com 

So Sweet PTU Tut

PSP: I used PSP9, but any version should do.
 Kit of Choice: I used  Colors of Purple by Country Princess Scraps. You can purchase it here.
 Tube of Choice: I used a tube by Suzanne Woolcott. You can find it here. Please do not use without the proper license!
Temp of Choice: I used Temp 3 here.
 Font of Choice: I used 2Peas A Little Loopy. This is a PTU font.

Let's get started!

Open template
Crop to merged opaque
Resize 525X421
Canvas size 600X600 centered

Delete the following:
Raster 15
Raster 13
Raster 9
Raster 8
Raster 5

Replace each template layer with color, element or paper of choice
I used the following:
Copy (2) of Vector 1- Paper 18
Copy of Vector1- Paper 18
Raster 7- Paper 18
Raster 6- #611170 Add Noise 35% Gaussian Monochrome checked
Copy of Vector 3- #611170 Add Noise 35% Gaussian Monochrome checked
Raster 4- #000000
Copy (2) of Vector 1- #8f79b9 Add Noise 35% Gaussian Monochrome checked
Copy of Vector 1- Paper 18
Raster 3- Paper 14
Copy of Vector 2- #000000
Raster 2- Paper 8
Copy of Raster 10- Paper 1
Raster 10- #611170 Add Noise 35% Gaussian Monochrome checked
Raster 11- #611170 Add Noise 35% Gaussian Monochrome checked
Raster 12- Paper 1
Raster 14- Papere 15
Raster 1- Floodfill #ffffff

Add any elements you want
I added the following:
Star Swirl 1- resize 90%
Small Bow 1- resize 45% free rotate left 20
Cupcake 1- resize 45%
Choc Strawberry 1- resize 20% mirror
CandyStick 4- resize 35% free rotate left 20
CandyStick 3- resize 35% free rotate right 20
Swirlpop 1- resize 35%

Drop shadow desired layers

Add your tube
Resize and mirror if needed
Duplicate
On duplicate- Gaussian Blur 3 change blend mode to soft light
Drop shadow original

Add tube again
Arrange inside one of the squares (see mine)
Delete any part outside of square
Change blend mode to Luminance(Legacy) Opacity 45
Repeat for other 2 squares

Crop Merged Opaque
Resize now if you plan on it

Add name, text & copyright
Save as .png & you're done!

I would love to see your results! If you would like to share just send them to me: sherenassweettreats@yahoo.com

Wednesday, September 12, 2012

My First Kit!

I love Halloween, so I decided to try to make a kit. This is my first kit, so go easy on me. LOL

 
Click the preview to download. If you download, please leave a comment.

 I would love to see anything you make with my kit! If you would like to share just send them to me: sherenassweettreats@yahoo.com

Saturday, September 8, 2012

Beautiful PTU Tut

Supplies Needed:
PSP: I used PSP9, but any version should do.
 Kit of Choice: I used Nature's Jewel by Gimptastic Scraps. You can buy it here.
 Tube of Choice: I used Soon Fall by Alex_Prihodko. You can find it here at PicsforDesign. Please do not use without the proper license!
Temp of Choice: I used TMW_SquareTemplate4_CM here.
Mask Of Choice: I used Vix_BigMask017 here.
 Font of Choice: I used Saginaw here.
Wordart I made (Just click to make it actual size, then right click to save.)
Let's get started!
 Open template
Crop merged opaque
Resize 525X489 pixels
Canvas size 600X600 pixels
Delete ©Info

Replace each layer with paper, element or color of choice
I used the following:
RightRec- Paper3
LeftRec- Paper3
CenterRec- Paper1
RightCircle- Paper9
LeftCircle- Paper9
CenterCircle- Paper9
DottedCircles- #474f20 Add Noise 25% Gaussian Monochrome checked
SmallSquares2- Delete
SmallSquares1- Delete
PinkSquare- Paper1
Spots- #474f20 Add Noise 25% Gaussian Monochrome checked

I moved CenterRec & CenterCircle to the top.
I also created frames around all except DottedCircles & Spots.

Add tube
Resize as needed & drop shadow

Add any elements you want
I added the following:
Pillow2- resize 65% free rotate right 90
Book- resize 40%
Flower3- resize 50%
Flower4- resize 50%
Flower5- resize 50%
Basket- resize 35%
Apple- resize 20% & duplicate twice
Butterflies- resize 40% recolored

Add the wordart I supplied

Drop shadow elements & wordart

Copy & paste paper of choice (I used Paper3)
Apply mask & merge group

Crop & resize now if you plan on it
Add name & copyright

Save as a .png & you're done!

I would love to see your results! If you would like to share just send them to me: sherenassweettreats@yahoo.com 

Friday, September 7, 2012

Cute Spook PTU Tut

Supplies Needed:
PSP: I used PSP9, but any version should do.
Kit of Choice: I used Spooky Stuff by Country Princess Scraps. You can purchase it here.
Tube of Choice: I used the poser that came with the kit.
Font of Choice: I used The Idiot here.
Plugin: VM Natural Sparkle
Let's get started!
 New canvas 600X600
Use the ellipse tool to draw a circle
Foreground: #d54f12 Background: Null
Stroke Width: 20
Objects Align Center in Canvas
Duplicate
On bottom Vector layer click + sign
Double click New Ellipse and change Foreground to #000000 and Stroke Width to 25
Convert both to raster
On top layer apply Inner Bevel with these settings:
Bevel:2 Width:8 Smoothness:24 Depth:4 Ambience:-4 Shininess:32 Angle:0 Intensity:32 Elevation:58 Color:White
Merge down

Copy & paste paper of choice (I used Paper26)
Move below Raster1
Select inside Raster1 with magic wand
Expand by 5
On paper layer invert & delete
Deselect
Apply VM Natural Sparkles with these settings:

Drop shadow Raster1

Add any elements you wish
I added the following:
Element45
Element43- resize 75%
Element32- resize 25%
Element77- resize 25% free rotate left 25
Element78- resize 25% then 70% free rotate left 25
poser1- resize 65%
Drop shadow all elements

Crop & resize now if you want
Add name & copyright
Save as a .png and you're done!
I also did one with animated bubbles. I got the bubbles from LoveShack's Animations & PSP Tutorials. I rotated and recolored them to match.

I would love to see your results! If you would like to share just send them to me: sherenassweettreats@yahoo.com 

New CT!!!!

I have joined another Creative Team! I have joined Country Princess Scraps' creative team. You can find her blog here. She just started selling her kits at Pics for Design. I'll have my first tutorial using one of her kits up later today.

Monday, September 3, 2012

Fall FTU Tut

Supplies Needed:
PSP: I used PSP9, but any version should do.
Kit of Choice: I used Fall for All by Gimptastic Scraps. You can find it here.
Tube of Choice: I used the girl from the kit. She is so cute!
Mask of Choice: I am using WSL Mask12 here
Font of Choice: I used Janda As Long As You Love Me here.
Let's get started!
 New canvas 600X600
Copy & paste Frame5 as a new layer
Resize 65%
Copy & paste paper of choice (I used Paper8.)
Select inside frame with magic wand
Expand by 5
On paper layer invert and delete
Deselect
Copy & paste Fence as a new layer
Resize 45% and move to left
Duplicate and mirror
Arrange so it looks like 1 continuous fence
Merge down
Copy & paste Bird
Resize 45%
Move to left and place on fence
Copy & paste Pumpkin
Resize 35%
Duplicate & resize 85%
Move to right
Copy and paste Scatter1
Resize 35%
Duplicate a few times and move around
Do the same with Scatter2
Continue doing this until you have a "ground"
See my tag for reference
Copy & paste Wagon
Resize 45% & mirror
Copy & paste Dog
Resize 35% & mirror
Copy & paste Girl
Resize 45%
Add WA
Resize 35%
Copy & paste Leaves3
Resize 35%
Merge down
Drop shadow everything

Copy & paste paper of choice (I used Paper2.)
Apply mask & merge
Resize 90%

Crop & resize now if you plan on it
Add name & copyright

Save as a .png & you're done!
I would love to see your results! If you would like to share just send them to me: sherenassweettreats@yahoo.com 

Thursday, August 30, 2012

Autumn Harvest FTU Tut

Supplies Needed:
PSP: I used PSP9, but any version should do.
 Kit of Choice: I used Amazing Autumn Add-on by Gimptastic Scraps. You can find it here.
 Tube of Choice: I used Soon Fall by Alex_Prihodko. You can find it here at PicsforDesign. Please do not use without the proper license!
Mask of Choice: I used WH-Mask15 here.
Font of Choice: I used 1 Smoothy DNA here
Plugin: MuRa's Meister Copies
Let's get started!
 New canvas 600X600
Copy & paste Frame3
Resize 75%
Copy & paste Paper6
Select inside frame with magic wand
Selections Modify Expand by 5
Copy & paste WagonWheel
Resize 65%
Move to the left side of the frame
Copy & paste AppleBasket
Resize 50%
Copy & paste Broom
Resize 65%
Free rotate left 20%
Copy & paste Pumpkin
Resize 35%
Duplicate
Resize 80%
Copy & paste Crow
Resize 40%
Copy & paste tube
Resize as needed
Copy & paste leaves
Resize 25%
Apply MuRa's Meister Copies with these settings:


Erase any leaves you don't want
Move leaves below tube layer and crow layer

Drop shadow desired layers

Add new layer above background layer
Floodfill with color of choice (I used #de5230)
Apply mask & merge group
Resize 90%
Lower opacity to 65%

Crop & resize now if you plan on it
Add name & copyright
Save as a .png & you're done!

I would love to see your results! If you would like to share just send them to me: sherenassweettreats@yahoo.com 

Amazing Autumn FTU Tut

Supplies Needed:
PSP: I used PSP9, but any version should do.
 Kit of Choice: I used Amazing Autumn by Gimptastic Scraps. You can find it here.
 Tube of Choice: I used Soon Fall by Alex_Prihodko. You can find it here at PicsforDesign. Please do not use without the proper license!
 Font of Choice: I used Janda As Long As You Love Me here.
Let's get started! 
New canvas 600X600
Copy & paste Frame1 as a new layer
Resize 70%
Copy & paste Frame4 as a new layer
Resize 85%
Move below Frame1
Copy & paste Paper6 as a new layer
Resize 70%
Select inside Frame1 with magic wand
Selections Modify Expand by 5
On paper layer invert selection
Delete & deselect
Move below Frame1
Copy & paste tube
Resize as needed & place to right side of frame
Copy & paste tube again
Resize & mirror
Erase any parts that show outside of frame
Change blend mode to Luminance(Legacy) & lower opacity

Copy & paste desired elements
I used the following:
Log- resized 65%
Tree- resized 70% & mirrored
Lantern- resized 45%
Bird2- resized 35%
Pumpkin- resized 35%
Flower5- resized 45%& duplicated to make a "border"
Flower3- resized 30% & duplicated a few times
Flower7- resized 30% & duplicated a few times
Flowe1- resized 30%

Drop shadow where desired

Crop & resize if desired
Add name & copyright
Save as a .png & you're done!
I would love to see your results! If you would like to share just send them to me: sherenassweettreats@yahoo.com 

Saturday, August 25, 2012

Golden Moments FTU Tut

Supplies Needed:
PSP: I used PSP9, but any version should do.
 Kit of Choice: I used Golden Moments by Gimptastic Scraps. You can find it here.
 Tube of Choice: I used Bridgette by Keith Garvey. I bought this tube when he was with MPT. You can now by his work at his store here. Please do not use without the proper license!
Mask of Choice: I used SST-Mask4 (by me!) here.
 Font of Choice: I used Secret Recipe here.
Let's get started!

New canvas 600X600
Copy & paste Frame4 as a new layer
Resize 65% all layers unchecked
Click inside frame with magic wand
Expand by 4
Copy & paste paper of choice (I used Paper9)
Invert & delete on paper layer
Move below frame
Drop shadow frame
Copy & paste your tube below the frame
Resize if needed
Erase any parts that show BELOW the frame
Drop shadow tube
Select all
Click on tube with Selection Tool (This keeps the drop shadow from becoming darker.)
Defloat
Select frame layer
Erase the parts where you want your tube to "pop" out
Deselect

Copy & paste any elements you want
I used the following:
Table- resized 35%
Goblet- resized 25%
Wine- resized 35%
Chair- resized 45%
GoldAngel- resized 25%
Hat- resized 25%, free rotate 35 right
Mask- resized 20%
Heel- resized 20%, duplicate & move slightly to right
Drop Shadow all elements

Copy & paste paper of choice (I used Paper1)
Apply mask & merge group
Add Noise Gaussian 35% Monochrome checked

Crop & resize now if you want
Add name & copyright

Save as a .png and you're done!
I would love to see your results! If you would like to share just send them to me: sherenassweettreats@yahoo.com

Mask #4

If you would like it just click on it to make it actual size then right click and save. If you use it in a tutorial please send them here to get it. Thanks!

Thursday, August 16, 2012

Back to School FTU Tut

Supplies Needed:
PSP: I used PSP9, but any version should do.
Kit of Choice: I used Time for School by Gimptastic Scraps. You can find it here.
Tube of Choice: I used the girl that came with the kit. There is also a boy, and they are both adorable!
Template of Choice: I used Template134 by Leah at Amy & Leah's Gimptastic Tuts. You can get it here.
Mask of Choice: I used SST-Mask3 (by me!) here.
Font of Choice: I used Oh Hello Candy (here) for the wordart and Impact for the name.
Plugin: (optional) Mura's Meister Cloud and Eye Candy 4000 Gradient Glow
Let's get started!
 Open template
Delete credit layer
Canvas size 600X600 centered

Replace each layer with color, element or paper of choice
I used the following:
1- Mura's Meister Cloud
2- Paper4
3- ruler element resized 75%
4- pencil element resized 75% free rotate 115 left
5- ruler element resized 75%
6- Paper6 and light blue fat gradient glow
7- Paper2 and white fat gradient glow
8- Paper9 and yellow fat gradient glow
9- Paper10, blinds and red fat gradient glow
10- Paper10 and white fat gradient glow

Copy & paste Frame2
Resize 50% and move into position around top layer
Copy & paste Girl
Resize 65%
Copy & paste School
Resize 45%
Copy & paste Bus
Mirror & resize 45%
Copy & paste Cloud
Mirror & resize 45%
Move school, cloud & bus below frame layer
Erase any parts that show outside of frame

Copy & paste Desk
Resize 55%

Copy & paste any "school supplies" you want and arrange on desk, resizing as needed
I used the following:
Glue- resized 25%
Scissors- resized 25%
Apple- resized 25%

Drop shadow desired layers

Add paper or color of choice as new layer right above background layer
Apply mask & merge group

Crop & resize now if desired

Add name, words & copyright

Save as a .png & you're done!

Mask #3

If you would like it just click on it to make it actual size then right click and save. If you use it in a tutorial please send them here to get it. Thanks!

Tuesday, August 14, 2012

Aloha FTU Tut

Supplies Needed:
PSP: I used PSP9, but any version should do.
Kit of Choice: I used Tiki Beach by Gimptastic Scraps. You can find it here.
Tube of Choice: I used an FTU tube by Lia. I got it through a yahoo group.

Mask of Choice: I used MC_MisfitBlingMask01 here.
Font of Choice: I used Satisfaction. It is a commercial font. 
Plugin: Mura's Meister Cloud. This is a free filter. Do a Google search to find it.

Let's get started!
 New canvas 600X600 pixels
Copy & paste Frame4
Resize 75% all layers unchecked
Select inside frame with magic wand
Selections Modify Expand by 5
Add new layer below frame layer
Mura's Meister Clouds default settings
Choose 2 colors to make it look like a summer sky
Deselect
Copy & paste cloud
Resize 45% and position on left
Duplicate and position on right
Erase parts that show outside of frame
Copy & paste water
Resize 45% and position at bottom of frame
Delete any parts that show outside of frame
Copy & paste Sand element above frame layer
Resize 75% and position at bottom of frame
Copy & paste tube
Resize if needed and position

Add any elements you wish
I added the following:
Palm Tree- resize 65%
Lei1- resize 45%
Tiki1- resize 35%
Shell1- resize 20% Duplicate mirror resize 85%
Shell3- resize 20% mirror

Apply drop shadow as desired

Add new layer right above the background layer
Floodfill with gradient of choice
Apply mask & merge group
Resize 90%

Crop & resize now if desired

Add name, wordart & copyright
Save as .png and you're done!
I would love to see your results! If you would like to share just send them to me: sherenassweettreats@yahoo.com